Learn the must know basics in this Jira Tutorial for Beginners. Understand all the critical functions that this is wonderful tool can help you with. Basically, Jira is a Product Manager’s best friend.
Familiarity with Jira is at the core of becoming an Agile Product Manager. Remember the Agile Methodology when you think of agile project management.
Jira is independent of your methodology. In other words, whether you use Kanban or Scrum, Jira can easily be used with both methodologies.
Now is also great time to review the top 15 benefits of Kanban.
It is also independent of your strategy, but fits in beautifully with the OKR Framework.

Learn how to break into product management.
Jira Product Management
Jira is to a Product Manager, what a stethoscope is to a doctor.
This is also a good time to remember the following differences.
Remember the above whenever you think of project management tools. Especially the Jira project management tool.
Check out the full list of top 10 product management tools.
Jira for Beginners Overview – Jira Basics
Atlassian Jira software is not only your project management software and product requirement gathering tool.
It is also a bug or defect tracking tool, feature prioritisation tool and release management tool. Everything rolled into one great software!
Do you know how to influence without authority?
Think of Jira like a cone of ice cream with different scoops of flavour.

Jira Tutorial for Beginners
Many companies use Jira for various purposes. It is one of the must have skills for a successful Product Manager. But, how to use Jira effectively?
Here is a comprehensive list –
- Documentation – As any good Product Manager knows, documentation can save you in critical situations. Remember, it is an absolute necessity to capture everything in writing. Your requirements, your roadmap and your timelines should be on paper. Also, it is important to maintain a version history of your changes. Confluence can help with that. Also remember to define what is in scope vs what is not in scope. Don’t forget the KISS principle!
- Bug or Defect Tracking – I think this feature is Jira’s biggest strength. It does an excellent job of tracking defects through the entire lifecycle. Also, you can have various statuses to better track the issue and you can immediately assign a bug to the relevant stakeholder. Finally, everyone can provide comments in a very easy format.
- Feature and User Story Prioritisation – Your entire sprint planning can be done in Jira. It gives you the option to prioritise features and user stories for your Scrum Teams. Your Scrum Teams can also do their user story pointing and provide estimates.
- Release Management – All the hard work ultimately comes down to a successful release. As a Product Manager, you need to make sure that all your deliverables are ready in time for the release. Keeping in some buffer is always a great idea to minimise development uncertainties. Being product agnostic helps.
Jira can also connect to various useful plugins to integrate with your entire development environment.
Do you know Warren Buffett’s Washtub Theory?
Jira Basics – Issue Types
This is a Jira defect tracking tool tutorial.
An issue does not refer to a bug or a defect in Jira. It simply refers to a type of documentation in Jira.
This is also a good time to make sure you know the top 15 benefits of Scrum.
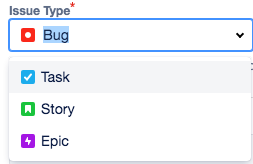
In the default configuration, there are four main types of issues in Jira –
- Bug
- Task
- Story
- Epic
The four types of issues in Jira are shown below.

Changing Issue Type Workflows
Jira lets you customize which issue types you want for your project.
Jira is probably the best tool for a PM because of the inherent flexibility. Do you know the top 10 tools for a Product Manager?
Not only that, Jira also lets you choose the type of workflow you want for each issue type.
You can also choose which fields show up by default, within each issue type.
However, these settings are a bit advanced and you don’t need to change them unless absolutely necessary.
Do you know the differences between Agile and Waterfall?
Since most fields are not mandatory, there is little merit to modifying these fields.

Jira Tutorial For Beginners – Create a Bug in Jira
So, how to use jira for product management? Creating a bug in Jira is very straightforward.
This is mainly because the vast majority of users use Jira for only bug management.
Here is a list of all the steps and a description of all the fields –
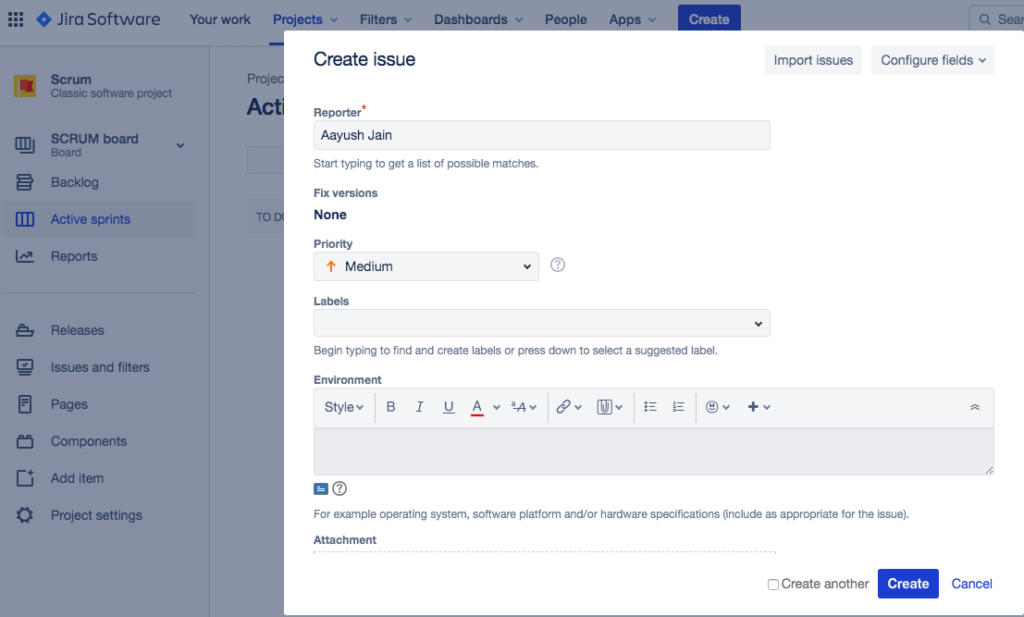
- Click on the blue “Create” button at the top of the screen (marked by the top most red arrow)
- A pop up open up where you can create any issue type
- By default, that project is selected within which you clicked on the “Create” button
Bug Description Fields
- If you want to change your project, click on the “Project” dropdown to select the project within which you want to create your issue
- Click on the “Issue Type” dropdown
- There are four types of issues listed here (as explained before)
- Select “Bug” as your issue type
- Summary field – Enter a short and descriptive summary for the bug
- Description field – Enter in a detailed description of the bug, possibly including the steps to replicate the bug

Supplementary Bug Fields
Then, you need to enter in data into the following fields –
- Reporter field – By default, the person who clicked on “Create” is filled in, you can also change the name to anyone else on your team
- Priority – Select a priority for this bug
- Labels – This is equivalent to “Tags”, and can help you identify similar bugs
- Environment – Select the environment where this bug was noticed (production, staging, development, etc.)
- Attachment – Attach any supporting screenshots or documents

Bug Link Fields
Finally, here are the last set of fields –
- Linked Issues – Select the type of link this bug has to another issue
- Issue – Select if this bug is dependent on any other bug being fixed (or any other bug is dependent on this bug being fixed); You can also link stories/tasks/epics here
- Assignee – Assign this bug to a person who will investigate it further
- Epic Link – Select the epic under which work for this bug will be tracked
- Sprint – Select the sprint under which work for this bug will be tracked
- Finally, click on the “Create” button and you are all set!

That was the complete list of steps that you need to create a bug in Jira. This completes the create a bug part of the Jira tutorial for beginners.
Jira Tutorial For Beginners – Create a Task in Jira
This is similar to creating a bug in Jira.
Tasks are small pieces of work that are assigned by a Product Manager to the scrum team developers.
Steps to create a task in Jira –
- Click on the blue “Create” button at the top of the screen (as shown before)
- The “Create” popup opens up
- Your default project is selected
Task Fields – First Set
Start out by filling in the following fields –
- Click on the “Project” dropdown if you want to change your project
- Click on the “Issue Type” dropdown
- Four types of issues listed here (as explained before)
- Select “Task” as your issue type
- Summary field – Enter a short description of the task you want to give to your developers
- Attachment – Attach any mockups, design documents or business requirement documents (BRDs)
- Description field – Explain the task in detail, include use cases if possible

Task Fields – Second Set
Here are the final set of fields you need to put in before creating your task –
- Reporter field – This should generally be the Product Manager
- Linked Issues – Select if this task is linked to a bug or another task
- Issue – Select the actual task/bug/defect that you want to link to this task
- Assignee – Assign this task to your developer
- Priority – Assign a priority for this task
- Labels – You can use this as “Tags” to track a bunch of similar tasks/bugs together
- Epic Link – Select the epic under which this task falls
- Sprint – Assign a sprint to this task
- Click on “Create” to create your task!

Jira Tutorial For Beginners – Jira Report Types
Jira has an immense library of in-built reports and dashboards for your reporting purposes.
You can futher customize there reports to suit your needs using a wide variety of tools.
You need to click on the “Reports” link in the left hand navigation menu to access all your reports.
By default, the reports will be for the project that you have already selected.

Jira Tutorial For Beginners – Online Resources
You should first go through the top 9 courses for product management.
Here is a complete list of all Jira agile online resources that you will potentially need –
- Atlassian Jira Login
- Online course – Jira Training
- Video – Jira Tutorial Youtube
- Comprehensive documentation – Jira Tutorial PDF
- Admins only – Jira Admin Tutorial
- Scrum Masters – Jira Scrum Tutorial
- Server download – Jira Tool Download
Other Project Management Tools
There are a wide variety of tools available out there. For example, Atlassian also has Trello that is specifically meant for Kanban boards.
While tools like Asana are more broad based.
Check out the top differences for Asana vs Trello.

Conclusion – Jira Tutorial for Beginners
You should now have a pretty good idea of how to use Jira. Always remember to communicate like a boss! In good times and bad, the Product Manager is expected to bring clarity for all stakeholders. You may have used similar tools in the past. Or you may plan to use a different tool in the future. That’s ok. As long as you have done a clear analysis as to what makes most sense for your company, you are good to go.
Product management during a pandemic? Even more important for you to over-use tools like Jira, Confluence, etc.

